Extending L4Re/Fiasco.OC to the Letux 400 Notebook Computer
Wednesday, April 18th, 2018In my summary of the port of L4Re and Fiasco.OC to the Ben NanoNote, I remarked that progress had been made on supporting other products and hardware peripherals. In fact, such progress occurred more rapidly than I had thought possible, and I have been able to extend the work to support the Letux 400 notebook computer. It is perhaps worth describing the Letux 400 in a bit more detail because it has an interesting place in the history of netbook computers.
Some History
Back in the early 21st century, laptop computers were becoming increasingly popular at the expense of desktop computers, but as laptops began to take the place of desktops in homes and workplaces, this gradually led each successive generation of laptops to sacrifice portability and affordability in favour of larger, faster, higher-resolution screens and general hardware specifications more competitive with the desktop offerings they sought to replace. Laptops were becoming popular but also bigger, heavier and more expensive.
Things took an interesting turn in 2006 with the introduction of the XO-1 from the One Laptop per Child (OLPC) initiative. With rather different goals to those of the mainstream laptop vendors, the focus was to deliver a relatively-inexpensive yet robust portable computer for use by schoolchildren, many of whom might be living in places with limited infrastructure where increasingly power-hungry mainstream laptops would have been unsuitable, even unusable.
One unexpected consequence of the introduction of the XO-1 was the revival in interest in modestly-performing portable computing hardware. People were actually interested in a computer that did the things they needed, rather than having to buy something designed for gamers, software developers, or corporate “power users” (of both the pretend and genuine kinds). Rather than having to haul increasingly big and heavy laptops and all the usual accessories in a big dedicated bag, they liked the idea of slipping a smaller, lighter device into their everyday bag, as had probably been the idea with subnotebooks while they were still a thing.
Thus, the Asus Eee PC came about, regarded as the first widely-available netbook of recent times (acknowledging the earlier Psion netBook, of course), bringing with it the attention of large-volume manufacturers and economies of scale. For “lightweight tasks”, netbooks were enough for many people: a phenomenon that found itself repeating with tablets, particularly as recreational usage of technology became more important to buyers and evolved in certain ways.
Now, one thing that had been a big part of the OLPC initiative’s objectives was a $100 price point. At first, despite fairly radical techniques being used to reduce cost, and despite the involvement of a major original equipment manufacturer in the production of the XO-1, that price point of $100 was out of reach. Even the Eee PC retailed for a few hundred dollars.
This is where a product known as the Skytone Alpha 400 enters the picture. Some vendors, rebranding this product, offered it as possibly the first $100 laptop – or netbook – to be made available for sale. One of the vendors offers it as the Letux 400, and it has been available for as little as €125 during its retail lifespan. Noting that it has rather similar hardware to the Ben NanoNote, but has a more conventional physical profile and four times as much RAM, my brother bought one to investigate a few years ago. That is how I eventually ended up embarking on this experiment.
Extending Recent Work
There are many similarities between the JZ4720 system-on-a-chip (SoC) used in the Ben and the JZ4730 used in the Letux 400. However, it can be said that the JZ4720 is much better understood. The JZ4740 and closely-related devices like the JZ4720 have appeared in a number of different devices, documentation has surfaced for these products, and vendor source code has always been available, typically using or implicitly documenting most of the hardware.
In contrast, limited documentation is known to exist for the JZ4730, and the available vendor source code has not always described every detail of the hardware, even though the essential operations and register details appear to be present. Having looked at the Linux kernel sources that support the JZ4730, together with U-Boot source code, the similarities and differences between the JZ4720 and JZ4730 began to take shape in my mind.
I took an optimistic approach that mostly paid off. The Fiasco.OC kernel needs augmenting with the details of the JZ4730, but these are similar in some ways to the JZ4720 and familiar otherwise. For instance, the JZ4730 has a 32-bit “operating system timer” (OST) that curiously does not appear in the JZ4740 but does appear in more recent products such as the JZ4780. Bearing such things in mind, the timer and interrupt support was easily enough added.
One very different thing about the JZ4730 is that it does not seem to support the “set” and “clear” register locations that are probably common to most modern SoCs. Typically, one might want to update a hardware-related register to change a peripheral’s configuration, and it must have become apparent to hardware designers that such updates mostly want to either set or clear bits. Normally in a program, to achieve such things involves reading a value, performing a logical operation that combines the value with a description of the bits to be set or cleared, and then the value is written back to where it came from. For example:
define bits to set
load value from location (exposing a hardware register, perhaps)
logical-or value with bits
store result in location
Encapsulating this in a single instruction avoids potential issues with different things competing to update the location at the same time, if the hardware permits this, and just offers something that is more efficient and convenient, anyway. Separate locations are provided for “set” and “clear” operations, and the original location is provided to read and to overwrite the hardware register’s value. Sometimes, such registers might only support read-only access, in fact. But the JZ4730 does not support such additional locations, and so we have to do things the hard way when updating registers and doing things like clearing and setting bits.
One odd thing that caught me out was a strange result from the special “exception base” (EBASE) register that does not seem to return zero for the CPU identifier, something that the bootstrap code in L4Re expects. I suppressed this test and made the kernel always return zero when it asks for this identifier. To debug such things, I could not use the screen as I had done with the Ben since the bootloader does not configure it on the Letux. Fortunately, unlike the Ben, the Letux provides a few LEDs to indicate things like keyboard and network status, and these can be configured and activated to communicate simple status information.
Otherwise, the exercise mostly involved me reworking some existing code I had (itself borrowing somewhat from existing driver code) that provides driver support for the Letux hardware peripherals. The clock and power management (CPM) arrangement is familiar but different from the JZ4720; the LCD driver can actually be used as is; the general-purpose input/output (GPIO) arrangement is different from the JZ4720 and, curiously enough once again, perhaps more similar to the JZ4780 in some ways. To support the LCD panel’s backlight, a pulse-width modulation (PWM) driver needed to be added, but this involves very little code.
I also had to deal with the mistakes I made myself when not concentrating hard enough. Lots of testing and re-testing occurred. But in the space of a weekend or so, I had something to show for all the previous effort plus this round’s additional effort.
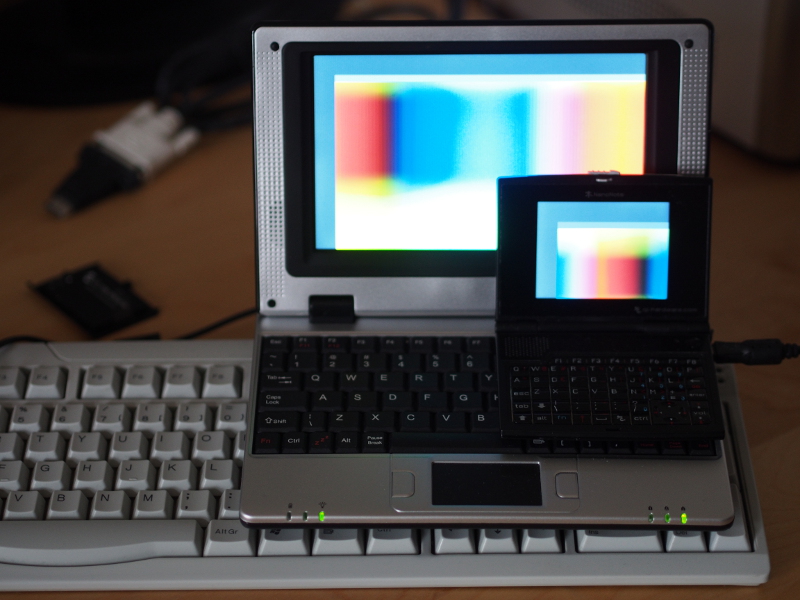
The Letux 400 and Ben NanoNote running the "spectrum" example
Here, you can see what kind of devices we are dealing with! The Letux 400 is less than half the width of a normal-size keyboard (with numeric keypad), and the Ben NanoNote is less than half the width of the Letux 400. Both of them were inexpensive computing devices when they were introduced, and although they may not be capable of running “modern” desktop environments or Web browsers, they offer computing facilities that were, once upon a time, “workstation class” in various respects. And they did, after all, run GNU/Linux when they were introduced.
And that is why it is attractive to consider running other “proper” operating system technologies on them now. Maybe we can revisit the compromises that led to the subnotebook and the netbook, perhaps even the tablet, where devices that are not the most powerful still have a place in fulfilling our computing needs.