Recording a Public Money! Public Code? video translation
A Dutch translation of the Public Money? Public Code! campaign video is in the works and close to being released. The video was initially released in English and has been translated in many languages already: German, French, Italian, Polish and Russian. And there is an even greater number of subtitles available. Getting a voice-over translation for the video was one of this year’s goals for the Netherlands local group, to help us advocate for this cause. Getting a voice-over translation can be much more involving than a textual translation, so that why I want to explain how we did it. And by showing others the way, hopefully there will be more audio translations in the future.
Getting quality
What makes a good voice over translation? It should be clearly spoken, be comfortable to listen too, be a correct translation, have a timing that matches the sound effects and visuals, has a varying tone that matches the message, and keep a rhythm to it to keep the attention. As you can tell, there are many factors that have to be balanced, requiring an iterative process. A good translation has to be adjusted if it doesn’t work for the required timing, and the best way to check the timing is by rendering the complete video with sounds effects. And so one has to be able to adjust parameters on the fly. Especially because arranging a voice actor and recording setup can be difficult and costly. You should be able to record it in about 5 to 10 takes. So you need a good preparation and the flexibility to make adjustments.
Process overview
Let me sum up the approach we took in the Netherlands:
- Subtitle translation: Translating the English subtitles into Dutch. Working with these .srt subtitle files has the benefit of having a timing attached to them. You’ll see the benefit of that in a minute.
- Adjusting translations for a voice-over: Speaking the translated subtitles to the video to get a feel for the timing. Focusing on long sentences especially. The ones where you need to speed up. Those should be shortened to enable silences and a slower pace for clear pronunciation.
- Record a demo to validate: Just like a singer, we recorded a ‘demo’. We put the modified subtitle translation file in a subtitle editor to have a consistent timing (more on that later) and recorded a voice track. No fancy equipment, just a phone headset microphone and Audacity recording software There were still some miss-spoken words and false timings in it, but it was good enough. This demo allowed us to validate the translation in the team, to be certain we were ready for a recording. We also used it to show the voice actor what to expect.
- Arranging the recording: We contacted a befriended couple for the recording. She has a quality voice, he has the technical knowledge and equipment for the recording. We had backup plans like renting equipment, reaching out to a local broadcasting station, or getting a professional to do it for us.
- The recording: This was the most critical, but also the most fun part of the process. Seeing the preparation pay off and getting a quality recording. More about the technical side of the recording further down in this article.
- Mixing: As we used two types of microphones for a stereo effect, they had to be balanced and mixed to get a nice sound. This was mostly done during the process of the recording. Also a gate and compressor were applied to reduce the noise during silences but keep a constant volume.
- Editing: Despite having a practical auto-cue from the subtitles file, it took a couple of hours of editing to get the timing right. I used the English recording, the sound effects track, and the video to check the timing. Mostly I just had to just move sentences one or two seconds in the timing. But some parts required breaking down sentences to leave more space between words, to reduce the pace of the rhythm. Although the largest part of the recording was from the last take, some parts had to be ‘repaired’ with pieces of earlier takes.
- Mastering: The PMPC video has a strong sound effects track. This does require the voice to cut through that for the audience to hear it. I had to apply more compression on the voice to further increase the volume, and had to EQ the female voice with a recommended boost at 400Hz and 4kHz to make it stand out more. Now both tracks could be combined into a single one to be added to the video.
- Release: Adding the audio to the video to actually publish it.
In this case I was involved in the recording, mixing, editing and mastering. A professional would probably do the mixing besides the recording, but I’m not sure about the editing and mastering. Please look into this when you want to do it.
Autocue
Early on I realized that reading translations from a paper wouldn’t cut it. Timing has to be correct, even though you can make corrections in the editing process. Having a timed text will help you keep the correct pace and eases the editing process.
First I tried reading from subtitles. Although that contains the timing, each time the subtitles pop up, you are surprised by the content and have to build a sentence. There is no way to view the next line of the translations, so you have to stop and pause until the next line shows up. This leads to a stop-and-go recording with bad rhythm.
Als an alternative I looked into autocue software and apps, but couldn’t find any that fit my need. Most were made for speeches, where there was no requirement on timing, it would just do a certain words per minute. But this use-case required exact timing.
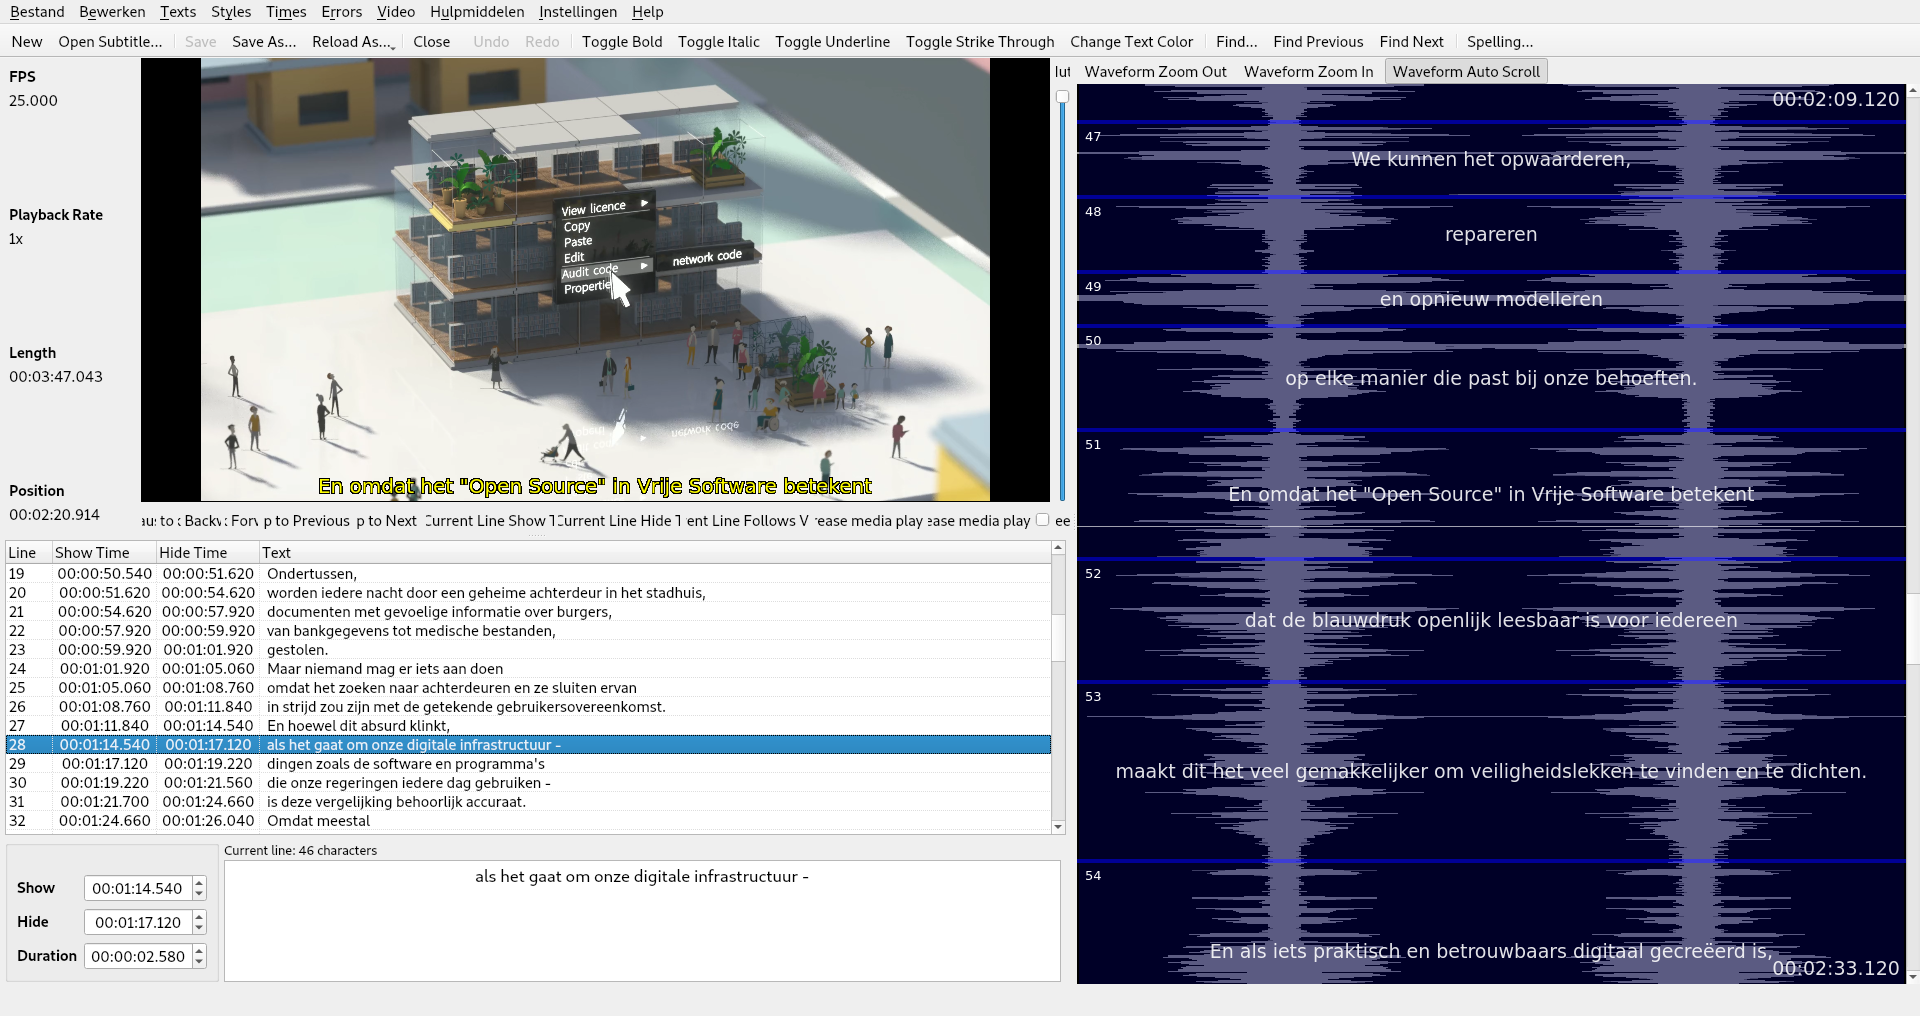
Then I found subtitle editors. Most have a preview where you can see overview of lines besides the video. That worked quite well. The best one I found was Subtitle Composer from the KDE suite of applications. Subtitle Composer has one major feature for this use-case: an auto-scrolling waveform.
 Subtitle Compositor overview
You load Subtitle Composer with the translation and the PMPC video file and can just press play. The subtitles will appear on the video but also on the side at the scrolling waveform. The scrolling waveform has the benefit of showing a bar indicating the current time, passing through boxed-off subtitles. This helps to give you a feel for if you are leading or lagging, and how much time is reserved for a sentence. It works similar to the interface of games like Dance Dance Revolution or Guitar Hero, which also solve the issue of timing in this way.
Thinking about it now, I could also have looked into karaoke solutions, because there also timing is critical. I’m not sure if that provides a similar option to look ahead to upcoming lines of text.
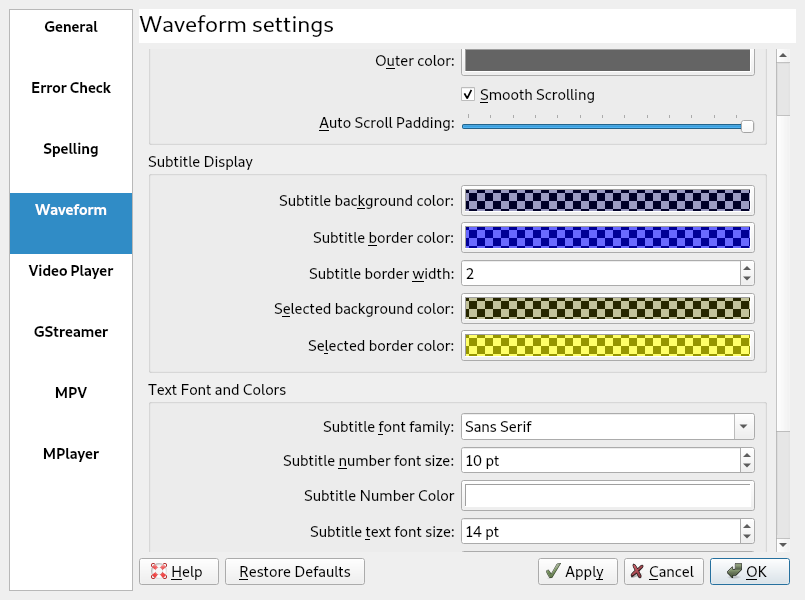
I made two adjustments to the settings of Subtitle Composer to enhance the experience of the auto-scrolling waveform:
 Subtitle Composer waveform settings
- Auto Scroll Padding: set to the maximum to prevent the waveform from jumping per page, causing the voice actor to lose its place. With the maximum padding it scrolls continuously.
- Subtitle text font size: The normal font size is quite small. I increased it to improve readability. The waveform changes its appearance to a horizontal waveform when the pane is stretched to more than about half the window size. In this horizontal form it becomes unusable for this purpose, so the waveform size is limited to about half the screen size. I found a size of 14pt was the largest I could go before words would end up besides the waveform screen.
Subtitle Composer is designed to make changes to the subtitles. Use that feature if you find that the current translation isn’t working in practice. For the Dutch translations we still had a typo in the translation, had some comma’s that were confusing the voice actress and she preferred to change the order of a sentences. We immediately changed these bits when we found them, so they went well in the next take. This allowed us to iterate quickly. Because of these modifications the last recording was used as the base, as it has the final version of the text.
Recording
Sound proofing
As any engineer will tell you: garbage in, garbage out. If you start with low quality, don’t expect it to end up much better at the end. Let’s start with acoustics. We recorded it in the study at my friends’ place. The room is box-shaped filled with two desks and a few closets. It has laminate flooring and a huge window pane off to the side. So plenty of surfaces to reflect sound and little to disperse or dampen it. We did some sound-proofing:
- Hung a blanket at the wall behind the voice actress
- Closed the curtains before the window pane
- Used sheets of sound dampening foam to build a box around the microphone with an opening to the voice actress
We did this with stuff that was already available in the house and it made a huge difference for the audio quality. It reduced the echo in the room and blocked out noise from us moving on our chairs and spanning computer fans.
Microphones
Perhaps we over-engineerd this part a bit. We used a Sure SM58 as the main voice microphone, combined with a matched pair of RØDE M5 microphones to pick up on the stereo effect of certain vowels. This all went into an M-Audio interface connected to the recording computer. We used the non-free Reaper software on Windows as my friend was used to it and had everything configured and ready to go. I guess we could as well have used Ardour, which I used for the editing and mastering. Perhaps something for a future recording. (I ended up with the WAV files of the recordings and the mixed recordings, so I could always recreate it if I needed to).
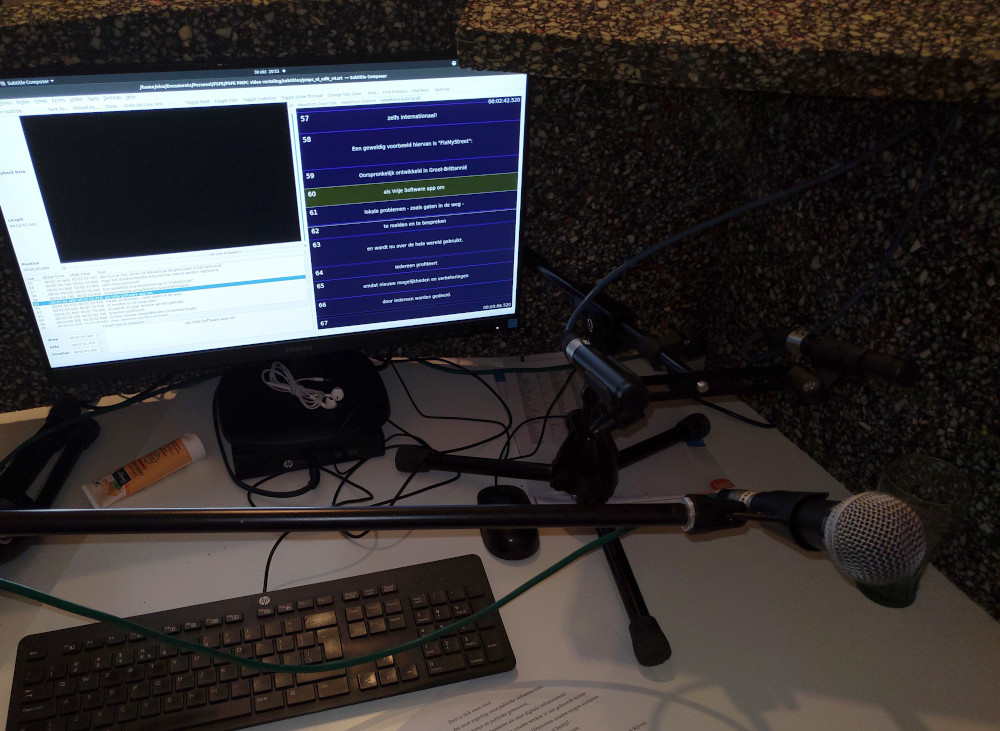 Sound proofed setup with microphone and autocue screen
The Sure SM58 has a built-in pop-filter, to reduce the amount of air blowing into the microphone when vowels like P, B, S, T and F are spoken. This blowing of air creates a high-volume rumbling which is hard to remove in post-processing. The word ‘PoPriaTary SoFTware’ is really in need of a pop-filter. In hindsight it would have been better if we used an additional pop-filter to mount to the microphone, to further reduce the pops. I still consider the end-result perfectly usable, but would encourage you to take care of this if you arrange the equipment yourself.
We recorded in 48.000 Hz like the audio in the video and recorded in 24bits to keep plenty of detail.
Keeping notes
Another tip is to keep notes during the process. Do you notice a word being mispronounced, did you hear an unintended noise, or do you notice some wrong intonation, just write it down. I printed the text before the recording and kept it at hand during the process of recording, editing and mastering. As you can see I used it quite a bit.
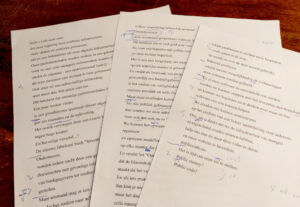 Notes taken during the recording and editing process
Reviewing
During the recording, we had the video and sound effect track ready to go, to verify the timing. Granted, a lot could be done afterwards ‘in post’, but it is nice to be sure you have everything you need before breaking up the studio. Perhaps there was the option to synchronize a video with playing the software, but we just clicked the play-buttons of audio and video at the same time. I’d like to think the intermediary review helped the voice actress to better understand the meaning and timing of the words, leading to a better result.
Editing and mastering
I used to use Audacity for editing recordings. But in this case I had to work with multiple tracks and add some effects. I prefer to do so in a non-destructive way so I have more flexibility when editing. As far as I know Audacity cannot do so, so this was a nice opportunity for me to get familiar with Ardour. I had some initial problems running Ardour, because it didn’t have the permissions to set realtime priorities for JACK. On Debian these permissions can be granted during installations or afterwards, as is described in the Debian JACK documentation. I was surprised that it was actually more performant than Audacity on my computer whilst packing more features.
 Ardour overview
I used four tracks for editing the recording:
- The final recording, used as the base of the sound track
- A track containing parts of other recordings to ‘repair’ certain parts
- The English audio track from the video, including sound effects, to compare timing of text
- The sound effects track to check timing and for mastering into a single file
The wave-form of the English track helped me to pinpoint where certain parts of audio had to start.
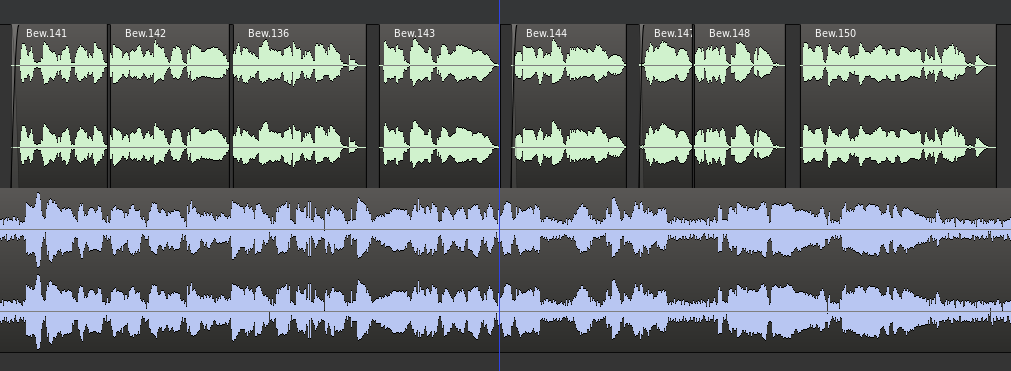 Detail of the added spaces in the voice track
As you can see, some sentences were really cut into pieces to increase the duration of silences between words. These are the small details that make it a more pleasant listen.
Besides fixing timing and repairing text, I also cut out some noised like deep inhaling or scraping a throat in between sentences.
Pay attention to the end marker in Ardour, as that will determine the length of the exported audio. I set that to the length of the sound effects track.
 Four tracks with effects on the two voice tracks
For mastering I added an equalizer to boost the 400Hz and 4kHz and used the VocalLeveller mode of the compressor to boost the volume. The sound effects track was mastered to zero dB sound pressure, hitting that level with the typing sound at the end of the video. The English voice also seemed to be mastered up to zero dB, so I did the same.
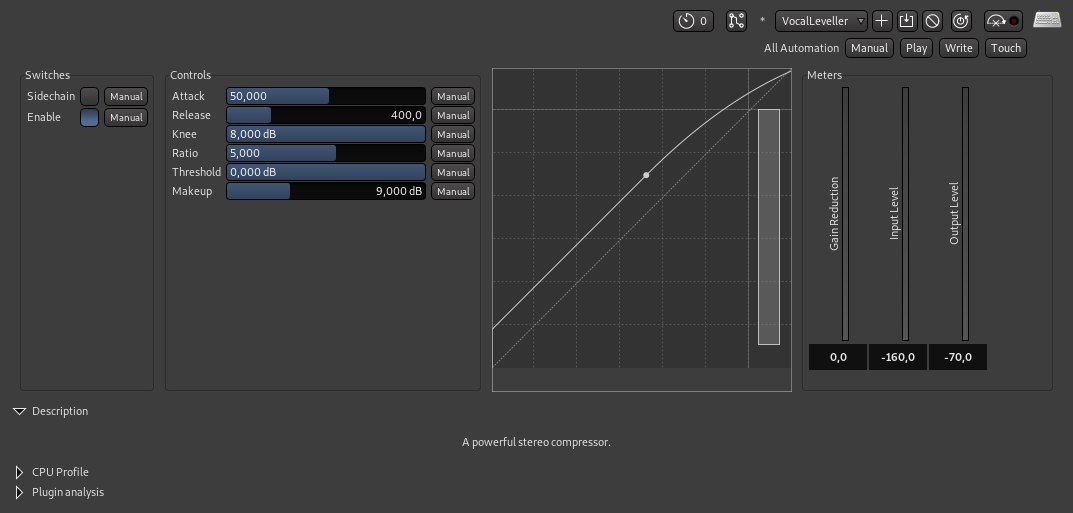 Ardour compressor settings
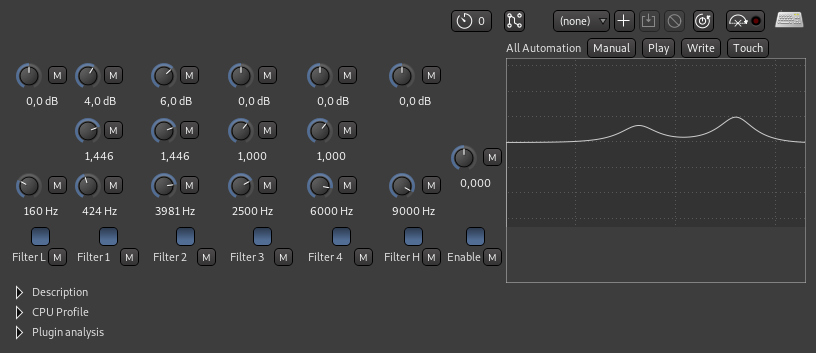 Equalizer settings
Release
The mastering resulted in a single .wav file to be added in the video. It already had the right length, as the end marker was set to the length of the sound effects track.
I initially added the sound to the video using OpenShot. Although that worked, it resulted in a stuttering video that wasn’t pleasing to watch. Perhaps it had something to do with my process or setup. Anyhow, I ended up choosing a different solution: using the power of ffmpeg to replace the audio but keep the video as is. This was also a lot quicker. I used the instructions from this helpful blogpost. This resulted in the following command taking in ‘pmpc_desktop.mp4’ for video, ‘pmpc-nl-mastered.wav’ for audio, resulting in ‘pmpc_desktop_nl.mp4’:
ffmpeg -i pmpc_desktop.mp4 -i pmpc-nl-mastered.wav -map 0:0 -map 1:0 -shortest -c:v copy -c:a aac -b:a 256k pmpc_desktop_nl.mp4
Considering that all mastered tracks of the video are kept stored at the FSFE, the core team probably also has a method to add the audio.
Final words
I would like to thank my friends for their help. The video is close to being released. Just a few checks and we should be able to publish it.
I enjoyed the process of making the video and the final result. It took more time than I originally anticipated, mostly because I had to work out how to do it. That why I wrote this blogpost, to encourage you to do it too and save you time by suggesting a methodology. In the process I learned some new skills and got to use some free software that was new to me.
We will continue the Public Money? Public Code! campaign in the Netherlands and the video will help us. And as a reminder, if you haven’t already, please sign the open letter if you agree with its content.