Free up disk space on /boot partition on Fedora

Had an error like this while upgrading your system lately?:

insufficient disk space
need 40M free on /boot (0M free)

If so, it’s likely because you have lots of kernels installed and the automatic size of your /boot partition, as configured during Fedora’s installation wizard, has become insufficient. In my case I have real-time kernels installed from Standford University’s CCRMA repos, in addition to the standard Fedora kernels. Here’s how to free up some space.

  1. Find out which kernel you are currently using – you need to make sure you don’t try and remove that one by mistake:
    uname -r

  2. List all the kernels that you currently have installed:
    yum list installed | grep kernel
  3. Now you can remove any kernels which you are no longer using. To do so you need to specify which version you want yum to remove. You can see the version of each kernel you have installed in the second column of the output of the above command. e.g. 3.10.7-100-fc18. To remove this kernel you would use the following command (adapt it according to the kernel version you want to remove):

    yum remove kernel-3.10.7

    Yum will tell you how much space will be freed and if any related kernel modules of the same version will be removed too (e.g. kmod-wl).

  4. That’s it, you should now have free space on /boot. Good luck!
Achieve reverse reverb (echo) effect with GNU/Linux audio plugins

Objective: achieve a reverse reverb effect using only MIDI and Free Software audio plugins. What we’re aiming for is the same piano effect that’s used on “Planisphere” by Justice (one of my favourite tracks).

Approach: I’ll use Qtractor Digital Audio Workstation (DAW), with a piano MIDI instrument, and the Impulse Response (IR) LV2 plugin. You could use any other DAW that supports LV2 plugins, e.g. Ardour.

Method:

  1. Make sure you’re using a GNU/Linux distribution that is configured to run with a real-time kernel, and has the JACK audio server set up and working.
  2. Open Qtractor, and create a new track, and set it up as your favourite MIDI piano instrument. In my case I used Calf Fluidsynth (available in many distribution repositories as part of the calf-plugins pack), loaded with a grand piano soundfont.
  3. Create a new clip and edit it with the “piano roll” (MIDI) editor to add some notes. Play the clip and make sure you can hear the sound. Here’s the clip that I used.
  4. Audio: piano-clip-no-reverb

  5. Make sure you have the IR.LV2 plugin installed. This will handle the work of applying the reverse reverb effect. If it isn’t in your distribution’s software repositories, it can be easily compiled. Just download the source code, extract it, cd into its directory and run make, then make install. You’ll also need to install zita-convolver before compiling.
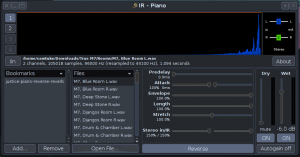
  6. IR.LV2 Plugin configured for reverse reverb

  7. In Qtractor, add IR as a secondary plugin to your piano instrument. IR should appear listed below the existing instrument plugin in the mixer window with a green light next to it showing that it’s enabled. If the IR plugin gui hasn’t appeared automatically, open it by double clicking on the IR plugin listed under the piano MIDI instrument in the mixer window.
  8. To make IR apply a reverb effect, we need an impulse response file to tell it what reverb pattern to use. I recommend the True M7 Impulse Pack, which contains a variety of high-quality WAV samples. Once downloaded and extracted, load a sample into IR by clicking “Open File” on the GUI. I’m using a room sample called “Blue Room L”. Here’s how my clip sounds with reverb applied.
  9. Audio: piano-clip-reverb

  10. By this stage, a reverb effect should have been applied to your piano, and if you play it you should hear the difference. To get reverse reverb, we have to do some configuration however. Try setting the following:

    Predelay = 0
    Attack, Envelope, Length, Strech = 100%
    Stereo In = 150%
    Reverse = on (toggled)
    Dry = Mute
    Wet = -6dB

    You can save this preset by clicking “Add” under “Bookmarks”. Choose somewhere sensible for the file and give it a name.By this stage you should see that the wave form in the graph preview window has changed, and that it illustrates a build up in volume representing the reverse reverb. Play your clip again – you should hear the desired effect!
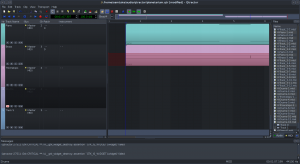
  11. See how clips in both tracks are offset by two beats

  12. You’ve now achieved the desired sound effect, but one problem remains – there’s now an audio delay between then the MIDI note should be played according to the tract, and when you hear the sound through speakers. This will obviously cause havok with the timing of your track and the other instruments that don’t have any delay in playback. There may be a more elegant solution to this problem, but here’s a workaround that works for me. Simply shift your piano clip(s) two beats (half a bar) earlier (to the left). With the IR settings above, this should correctly compensate for the delay. Now if you add other tracks, they should sound syncronised with your reverse reverbed track.
  13. That’s it, good luck!

Use sfArk SoundFont instruments on GNU / Linux

SoundFont is a technology for generating sample-based instrument sounds. It’s supported on GNU/Linux by a variety of apps, including Qsynth, which can be used as an external JACK instrument and connected to Digital Audio Workstations like Ardour 3 and Qtractor.

Many SoundFont instruments are freely available, but some of them are compressed and instead of of the .sf2 file extension, are .sfArk files. sfArk is a custom compression system, but fortunately these too can be used on GNU / Linux. Here’s how.

  1. Install the dependencies (this command is for Debian / Ubuntu based systems):
    sudo apt-get install git zlibc
  2. Clone the sfArkLib repository:
    cd ~
    git clone https://github.com/raboof/sfArkLib.github
    cd sfArklib
  3. Compile and install sfArkLib by following the github instructions
  4. Clone the repository of the sfArkXTm command line utility:
    git clone https://github.com/raboof/sfArkXTm
  5. Compile sfArkXTm:
    cd sfArkXTm
    make

    Note: the sfArk command line utility for extracting sfArk files is only installed in directory that you compiled it in. Unless you move the binary to a system directory, or create a synlink to it, you will always have to specify the path to the binary when you use the utility.
  6. Convert your .sfArk file to a standard .sf2 file:
    cd /path/to/your/.sfArk-file
    ~/sfArkXTm/sfArkXTm yourSfarkFilename.sfArk yourSfarkFilename.sf2

That’s it. Good luck!

Be Open or be insecure – Hemlis must choose

Hemlis
The beautiful and secure messenger?

Today Hemlis, a proposal for a new encrypted mobile messaging app, received $125,000 in crowdfunding. It’s wonderful to see ambitious new software projects get support from the community, especially when they are Free Software which can be used, studied, shared, and improved by everyone. But is this really the case with Hemlis?

A few moment’s thought are all that’s required to realise that the only trustworthy app is a Free Software app. This is why the US Government goes to the trouble of certifying Free Software encryption cyphers as their national standard, why the NSA uses GNU/Linux and Hadoop to monitor the world, and why everyone from the armed forces to drug smugglers turn to Free Software network tools like Tor to cover their tracks online. After all, what use is security that cannot be verified, because its workings are secret?

Considering the obviousness of these facts, Hemlis, self-billed as “The Beautiful & Secure Messenger”, could reasonably be expected to be 100% Free Software. Many indicators point to this not being the case however.

The crowd-funding model Hemlis used rewards donors with “unlock codes” which extend app functionality with picture messaging, among other things. This business model is as old as the hills, and just like the shareware and neo-proprietary (aka ‘open core’) apps that came before it, provides exclusivity to paying customers by artificially locking other users out. The code that locks other users out we refer to as an “anti-feature” because its functionality that’s built for the sole-purpose of inhibiting what a user can do. For an excellent (and terrifying) explanation of how anti-features are harming humanity and their environment hear Benjamin Mako-Hill’s recent keynote speech on the subject.

Benjamin Mako Hill
Mako Hill on anti-features

But shareware / neo-proprietary software cannot, by definition, be Free Software. One of ways Free Software protects users is by making them immune to anti-features, because when you have the source code to a program, you can simply remove or disable unhelpful code to suit your needs. Because anti-features serve nobody but the original developer, they don’t last long in the wild, and usually get swiftly removed. The Hemlis founders are smart people, and among them is Peter Sunde, famous for his leading role in the Pirate Bay, also known as “the World’s most resilient BitTorrent tracker”. Peter et al wouldn’t base their funding model on a reward system that was destined to be undermined on release day, so some part of the initial Hemlis app must be non-Free Software, or perhaps all of it. And as we know, non-Free Software cannot be trustworthy software, which is Hemlis’ stated purpose.

But it’s not just the Hemlis mobile apps that are looking suspiciously closed. From the official FAQ:

We have all intentions of opening up the source as much as possible for scrutiny and help! What we really want people to understand however, is that Open Source in itself does not guarantee any privacy or safety.

As the quote says, the availability of source code is not a sufficient condition for security or privacy. Availability of source code is, however, a necessary condition for those things. It doesn’t sound like the team are committed to Free Software, privacy, or security from the above statement – if they were, then they wouldn’t imply that 100% source code availability is impossible, which, as they are writing the app themselves, is patently not the case. The FAQ continues:

It sure helps with transparency, but technology by itself is not enough. The fundamental benefits of Heml.is will be the app together with our infrastructure, which is what really makes the system interesting and secure.

Their explanation emphasises the critical relationship between the Hemlis mobile client and the developer’s own server infrastructure. That sounds like a centralised service, i.e. a single messaging server to which all the mobile clients connect, which is the same network model that so many other proprietary messaging apps use, including BlackBerry Messenger and What’s App. However their description hints at Hemlis’ own control of the server as well as centralisation. But why should the Hemlis dev team be the only ones to run a Hemlis messaging server? It remains to be seen whether the quote is referring to infrastructure software, or infrastructure service – e.g. whether the dev team will make the Hemlis messaging server Free Software, or just keep it for themselves along with control over the network and knowledge of where all our messages go.

Being Free Software is a necessary condition for privacy and security
Source code availability is a necessary condition for security

These observations raise important questions about how trustworthy Hemlis will be when it’s finally available, and whether $125,000 of community good will shall be invested in Free tech for the good of everyone, or (at least) partly closed tech for the good of the Hemlis project founders. I’ve already sought answers to my questions on Twitter but so far received no response. Hopefully we’ll all have more information soon.

And until Hemlis materialises in an app store near you, you can use an existing Free Software messaging app that has already had its privacy tested and it’s decentralised network independently deployed: Kontalk is in both the F-Droid and Google Play stores, ready for your use. I’ve been using it for cost-free text and picture messaging back to the UK from Germany since I moved four months ago. If you’re looking for a glitzy website featuring a heartfelt plea for your money from a celebrity, you’ll be disappointed. But if you’re looking for bullet-proof privacy and seamless integration with Android, try Kontalk.

Login as SuperUser on Murmur / Mumble-server on Debian

I’m trying out Murmur / Mumble-server at the moment for conference calls and meetings for FSFE campaigns. The service is great, and audio quality top-notch. Installation and configuration was generally very simple.

In order to have private conversations however (where uninvited users cannot participate), you must first log in as the pre-configured admin user, called ‘SuperUser’. Achieving that was rather confusing on Debian, so for future reference, here’s how to do it.

  1. Set the SuperUser password via the Murmur server CLI:

    sudo /usr/sbin/murmurd -ini /etc/mumble-server.ini -supw <password>

    You must run the command as root, and you must specify the .ini file. Do not use murmur-user-wrapper, which Debian provides.

  2. Connect to the Murmur server using the Mumble desktop client, specifying username SuperUser, and the password that you set above.

Good luck!

Install Ardour 3.1 on Fedora

Ardour 3 is the most powerful Free Software music software currently available. Although Fedora isn’t a GNU/Linux distribution that’s designed for audio professionals, with a little work it can be configured to process sound with low-latency (without 20+ millisecond delays or artefacts like pops and crackles), and get easy access to repositories with many recent pro-audio apps.

We’ll compile Ardour from its source code in this tutorial, because this will get us the very latest version (with features and bug fixes missing from older copies), and because Ardour recently switched to a payment-oriented package distribution model which promotes source compilation as the installation method for people who aren’t Ardour donors.

We’ll also set up the CCRMA package repositories, which contain many audio apps not found in the default Fedora repos, and most importantly will supply us with a real time kernel (which Ardour, and low-latency operation in general, requires). The CCRMA repos are provided by the Stanford Center for Computer Research in Music and Acoustics.

These instructions are designed to work with Fedora 18 and Ardour 3.1.1, though I expect they will work as well with later versions of both. If not, let me know and I’ll try and tweak the guide.

  1. Install package dependencies required by Ardour:
    yum install git jack-audio-connection-kit-devel libsndfile-devel liblo-devel aubio-devel cppunit-devel cwiid-devel liblrdf-devel libsamplerate-devel lv2-devel serd-devel sord-devel sratom-devel lilv-devel flac-devel gtkmm-2.4-devel gtkmm24-devel libgnomecanvas-devel libgnomecanvasmm26-devel suil-devel libcurl libcurl-devel uuid uuid-devel libuuid libuuid-devel lib fftw3 fftw3-devel liboggz liboggz-devel
  2. Setup the CCRMA repositories (more detailed info in the Fedora manual):
    su -c 'rpm -Uvh http://ccrma.stanford.edu/planetccrma/mirror/fedora/linux/\
    planetccrma/13/i386/planetccrma-repo-1.1-2.fc13.ccrma.noarch.rpm
  3. Update existing packages and refresh what’s available:
    yum update
  4. Install real-time (low-latency) kernel and drivers from CCRMA:
    yum install planetccrma-core
  5. Reboot your machine to use your new real-time kernel.
  6. Download Ardour via  Git and compile it by following the simple official instructions (see “Building Ardour 3.x”). I recommend not installing Ardour unless you really need to (installing is the final step in the official instructions that simply creates links within Fedora’s menus etc. and isn’t required for compiling / running / using Ardour).
  7. Start the jack sound server by running qjackctl (either from system menu or CLI), and click on “start”.
  8. Run your newly compiled Ardour (execute this from within the directory you compiled Ardour in):
    cd gtk2_ardour
    ./ardev

Those are all the necessary steps and you should now have a fully functional copy of Ardour! I recommend installing some additional LV2 plugins however to extend the built-in MIDI instruments that are available within Ardour.

  1. (Optional) Install additional synthesisers for Ardour:

sudo yum install lv2-triceratops lv2-synthv1 lv2-calf-plugins lv2-calf-plugins lv2-mdaEPiano

Those synths should appear automatically as available MIDI instruments when you restart Ardour.

I hope that running Ardour in the way I’ve described will whet your appetite to dive more deeply into audio production on GNU/Linux. If so, I recommend using a dedicated GNU/Linux distribution for audio work, because it’ll provide you with many more tools and features, and save you having to manually configure them all yourself. For now KXStudio is my clear favourite.

Good luck, and let me know how you get on in the comments 🙂

Use Twidere Twitter client with identi.ca

Twidere is a great Free Software Twitter client for Android that also works with identi.ca. The identi.ca server must be configured manually however in order to do this. The below instructions work with Twidere 0.2.1.

  1. Tap the accounts tab (fourth icon from left with multiple human silhouettes)
  2. Tap the ‘+’ button top right to add a new account
  3. Tap the server icon top right next to the spanner icon to configure the server
  4. Change the REST Base URL to https://identi.ca/api
  5. Set the Auth Type to ‘Basic’
  6. Tap OK
  7. Enter your identi.ca username and password
  8. Tap ‘Sign in’

That’s it! Good luck.

Make your ownCloud app compatible with the new filecache

Robin Appelman has recently rewritten ownCloud’s filecache components, and made a variety of improvements to the filesystem handling classes. Some of the changes break compatibility with existing apps however, especially if they use the filecache directly.

I have just finished making the encryption app compatible, and here are the instructions I followed (originally posted by Robin to owncloud@kde.org):

OC_Filesystem and OC_FilesystemView have been renamed to \OC\Files\Filesystem and \OC\Files\View. For backwards compatibility they are still available under their old name for now but that will probably change in the future.

The filesystem cache is accessible with the following functions:

  • \OC\Files\Filesystem::getFileInfo($path)
  • \OC\Files\Filesystem::putFileInfo($path)
  • \OC\Files\Filesystem::getDirectoryContent($path)
  • \OC\Files\Filesystem::search($query)
  • \OC\Files\Filesystem::searchByMime($mimetype) (accepts both ‘text/plain’ and wildcard ‘text’ style mimetypes)

If you need to access the cache for files outside the user’s home directory, the same functions are available in \OC\Files\View.

Enable USB debugging mode on CyanogenMod 10

To enable the developer options settings in CyanogenMod 10 you need to do something quite obscure:

Go to Settings -> About Phone -> click “Build Number” six times in a row.

This information is available elsewhere, including where I found it, but hopefully reposting here will make it easier to find.

Run ownCloud Cucumber tests on Fedora 17

ownCloud uses automated testing to check for problems, and writing and executing these tests is important for any contributor. In my capacity as an ownCloud systems developer I use these tests to quickly verify that my apps don’t break after merging or pulling new code. For those less familiar with Ruby however, getting the Cucumber based behaviour tests running can be confusing. Here’s how to do it on Fedora.

  • Install the necessary dependencies:
    sudo yum install libxslt libxslt-devel libyaml libyaml-devel xorg-x11-server-Xvfb openssl-devel
  • Install RVM. If you have previously installed it, you may need to reinstall it so that the newly available libraries are used:
    sudo rvm install 1.9.3
  • Install the Selenium gem:
    sudo gem install selenium-webdriver
  • Clone the acceptance-testing repository from GitHub:
    git clone https://github.com/owncloud/acceptance-testing
  • Switch to root (su), and enter the newly created directory (this will trigger the .rvmrc shell script):
    cd acceptance-testing
  • Accept the warning and agree to run the script
  • If the script encounters errors (e.g. “RVM not found” or “RVM is not a function”), then open a new terminal, and repeat steps from “Switch to root”.
  • If you are testing a copy of ownCloud running locally on your machine, start your webserver, e.g.:
    service httpd start
  • Run cucumber to execute the tests:
    cucumber HOST=foo.bar.com features