Automatic name tag generation, SVG to PDF

Text-based Open Formats are wonderful. SVG has been acclaimed last week, and here is yet another reason to like and use it.

I needed to generate (many) name tags for the legal workshop – expecting hours of name copy-pasting, my least loved task ever. The template SVG file was in Inkscape, and I had no idea how to automate this time consuming process.


Luckily, I have extremely kind friends. Here is what we did:

  • Create a template SVG with the design (it’s a full A4, folded to only show the names as on the pic above).
  • Add some text (unique if possible, we used xyz1, xyz2 and xyz3) exactly where you expect the name, position and organisation of your participants to be.
  • Create a pretty CSV file with one participant’s data per row. For example:

“Lucile F********”,”French Team”,”Free Software Foundation Europe”

  • Open your SVG file in a text editor ( We CAN do it! Beautiful open formats )
  • Search for your strings (xyz1, 2 and 3 in my case).
  • Write a script to automatically replace those strings with the data in your CSV file, rename the files and save them as PDF.
  • Run your script. You’re done!

Of course, the “write a script” part of the plan took a lot of time, mostly because I wanted to understand and be able to redo it. According to my friend, with some experience the whole process should not take more than half an hour.

I traded hours of boring copy-pasting for hours of thrilling python courses! It was a good deal, and I have a new reason to celebrate Open Standards, less than a week after Document Freedom Day.

Loop a PDF presentation

Finding how to make a slide show loop should be an easy task, but it just proved itself extremely frustrating. I was unable to make Impress (LibreOffice 4.2) loop my poor two slides. The normal process should be:

  • Slide Show > Slide Transition > Advance slide > Automatically after #seconds (30 in my case) > Apply to All Slides.
  • Slide Show > Slide Show Settings > Type > Auto (00:00:00 to make it loop without a black screen in the middle).

But this is theory. In practice, the slides change every single second, weirdly. Several bug reports seem to say that I am not the only one experiencing the problem.

Here is the simple solution I (painfully) found:

  • Export as PDF
  • Open in Okular
  • Settings > Configure Okular > Presentation > Advance every #seconds
  • Loop after last page

It works perfectly. Thanks Okular!

EC Copyright Consulation (2)

Tonight at 7, we will meet again at the office to work on the EC Copyright Consultation. The last meeting was very good. There was five of us, 40% female participation \o/

As expected, we spend half the time struggling to answer questions, and half the time debating and putting the world to rights. We all also realised how little we knew about the topic. A imaginary conversation:

Consultation: “Are you sometimes blocked when trying to do this or that online?”

Us: “Well…we somehow remember that we are supposed to be, but you know, as soon we are blocked we circumvent the blocking measure… like everyone else does.”

(Resemblance to existing persons and situations is purely coincidental..)

A recurring remark (when not using copywrongs.eu) was : “They [the European Commission] REALLY don’t want us to answer this consultation… .” …but we will.

After a week reading, tonight’s session should be even more productive.

Interview RT (Russia Today)

This morning I went to RT’s Berlin studio to talk about EU Data Protection Day. A journalist contacted the cryptoparty Berlin team, and I volunteered to answer her questions.

I was barely in the studio when they made me sit, straight up and look at the camera. No one really explained anything. The journalist had given me half a dozen very interesting questions about privacy and data protection, I was ready to talk for 2 hours. The actual interviewer (a strange woman in Moscow with an outstanding purple dress and heavy make-up) asked two very basic questions and let it go: it lasted something like a minute and half. I didn’t even say the word Free Software.

It’s the third time in a month that I have frustrating interviews during which I can’t say anything interesting. I need to get used to it and/or to write a good talk and start submitting it to conferences to get control over my own speech back 😀

DFD international meeting, Nov 2014

A week after it, I finally found time to write about our international Document Freedom Day meeting. Last week the DFD core team met in Berlin to discuss next year’s campaign. We have a bit less than four months left, and it’s not much.

Represented countries: Germany, France, Turkey, UK, Finland We discussed the new aspects of this year’s campaign, the new subcampaign about Open Standards in education, merchandising, advocacy material, new content on the new website (!), our strategy to grow DFD outside of Europe and so on..

Two highlights:

  • we each chose areas we are responsible for. Contact me if you have questions or suggestions on how to grow DFD in your country; on how to reach more non-technical computer users (ideas to improve explanations on documentfreedom.org are especially welcome); or help with fundraising (with Sam).
  •  we had the pleasure to have Nermin Canik from Turkey. She explained how she coordinated numerous volunteers, reached the press, and why five new great events happened last year in her country. Thanks again for coming Nermin, your work will inspire ours!

♬ For the future of collaboration, information accessibility and long term archiving, chose open standards ♬

Skype reverse-engineering court case

On October 22, a court in Caen, France, ruled that a French SME didn’t infringe Skype’s copyright by reverse-engineering the algorithm used by the company for its VoIP services, and attempting to use it commercially.

The SME called Vest Corporation wanted to build a system interoperable with Skype. According to the French online newspaper PCINpact, this case was important because it was questioning the legality of reverse-engineering, and of the products based on reverse-engineered technologies.

The two founders of Vest Corporation have been cleared and Microsoft-Skype was ordered to pay 1000€ in damages.

The prosecution has appealed against this decision.

Accepting a security signature, Fedora 19

Welcome in the head of a user! (check Open Advice page 121 to know where does this post come from)

Last week I upgraded to Fedora 19, at work.

For the first update of this new release, the user needs to say that she trusts the source of a package. The “help” page is quite hard to understand, which is a problem.

  • Repository name: rpmfusion-free-updates

I know rpmfusion but have never heard of this “free updates” thing.

  • Signature URL: /etc/pki/rpm-gpg/RPM-GPG-KEY-rpmfusion-free-fedora-19

Perfect, it gives me a PGP public key. But it’s in /etc, which means that this key already magically arrived on my computer? Why? How? When? How do I verify it?

  • Signature user identifier: RPM Fusion free repository for Fedora (19) <rpmfusion-buildsys@lists.rpmfusion.org>

Sure, but it doesn’t really help. Does it just mean that I should write to a mailing list to tell them that I don’t get what they are trying to tell me to do 😀 ?

  • Signature identifier: 172FF33D

Ha, that looks useful. But again, I don’t know where to verify it.

  • gstreamer1-plugins-ugly-1.0.10-1.fc19.x86_64

Strange name… I don’t know what it is or what it is for. If I say that I don’t want to trust this package, the general update process stops.

  • Do you recognize the user and trust this key?

Well, no I don’t. But I still want my other updates! Having security pop-ups is good, but not if it confuses the user more that it helps her.

The help page says

To trust a repository, you should verify the details of the signing key. Normally the best way to do this is to go to the web page of the software source, and try to find details about the key used to sign the packages. This is normally called a GPG key.
You should only proceed with this dialog if you are happy to trust packages from this software source.

Fine but there’s no URL in the pop-up. Should I check the website of rpmfusion, of Fefora (19), or this “gstreamer…ugly” package?

On the RPM Fusion website I can verify the RPM Fusion’s signing keys. There is a  “RPM Fusion free for Fedora 19” key, but the key fingerprint doesn’t appear in the pop-up.

Result: I’m stuck.

Verifying the keys is important, I would like to know how to do it. 90% of not very technical users would just click yes in this situation, because a computer needs to work and not just to bother us.

Next step: contact someone involved in the fedora project and improve the documentation.

Pre-printing work

Thanks to Sam, I understand better some basic concepts of pre-printing work. Since it’s extremely useful for anyone wanting to print advocacy (or other) material, here is what I understood.

We used Inkscape and Scribus.

Resolution
Professional printing requires your image to have a high resolution. Resolution is expressed in “dots per inch” or dpi. A good resolution for the printer we are using is 300 dpi.

If the graphic you want to print is a vector graphic, no problem, it can be as high definition as needed. If it’s a photo or something similar, the very high resolution has to be taken into account from the start.

Setting the resolution in Inkscape: File -> Export Bitmap -> Bitmap size -> 300 dpi

Colors
I’m still completely lost in the world of colors. Getting exactly the same colors on your screen and on paper is a nightmare.

Three pieces of advice:

  • Let it be, you can’t control everything
  • If you REALLY want to, calibrate your screen
  • or use a color matching system to find the name of the colors you want and define them individually. Use CMYK color model (Cyan, Magenta, Yellow and Key – black).

Bleeds
Bleeds are extra colored space on the sides or your designs. It’s a little bit like margins, but colored. It is made to be sure that you won’t end up with a white strip around your design, while it was supposed to be entirely colored.

For our printing company, the bleeds have to be 3mm on each side. So if your sticker I supposed to be 74 mm / 74 mm, the page including bleeds should be 80 mm / 80 mm.

Exporting from Inkscape, importing to Scribus
I still haven’t really understood why is this step needed, but it has something to do with some colors scheme being supported better by Scribus.

  1. In Inkscape: Export Bitmap -> Page -> 300 dpi -> Export
  2. Open Scribus
  3. When you create a new document, set the bleeds (next to ‘margin guide’) (3mm). The margins must be at 0mm
  4. Create a image box the size of your page
  5. Import the .png image in your image box
  6. Save as PDF (there is an icon in Scribus 1.4.3)
  7. In the ‘Color’ tab, chose ‘Output Intended For’ -> Printer
  8. In the ‘Pre-Press’ tab, check the box ‘Use Documents Bleeds’ in the ‘Bleed Settings’ part

Save. Congratulations!

Tips for AFK meeting moderation

Before joining FSFE I have been part of many other political groups or movements. In several of them we spent a lot of time implementing and enforcing basic but strict moderation techniques for meetings. It’s designed for AFK meetings but I’m sure the same kind of things exist for video conference or IRC meetings.

Many Free Software projects already use moderation techniques, and several of the tricks described bellow won’t make sense for small meetings like fellowship events. I’m however sure that there are still things any event organiser can pick from the list.

When do we need meeting moderation techniques ?
A little bit of it is useful in any kind of meeting with, lets say, more than 5 people. It quickly becomes natural. It is especially useful when hot topics are discussed or strong opinionated people are present. The bigger the meeting, the stricter the moderation.

Why do we need meeting moderation ?
It aims at ensuring that the meeting won’t be hijacked by a little group of people and at easing the active participation of the greatest number of attendants – especially shy ones. It also greatly increases productivity!

The chair
No matter what the tricks are, we need people to enforce them (especially for big meetings). The chair is usually elected or chosen at the beginning of the meeting. It is composed of :

  • A main moderator: he or she listens to the group and leads the debates – and must be able to tell anyone to shut up if needed.
  • Someone taking the minutes
  • Someone keeping a list of speakers and, if needed, checking the length of each speech

The agenda
Having a precise agenda ready before the meeting is a good idea. In there should be the topics that will be discussed, and how long the discussion on each one should roughly be.

Who controls the agenda has a lot of power over the meeting. The agenda must therefore at least be publicly available and participants should ideally be able to modify it / be part of its redaction beforehand.

I used to complain very loudly when an agenda was imposed by the chair of some meeting, because an agenda is never “neutral”. I’m now less loud but still believe that no democratic decision can be taken during a meeting if its agenda hasn’t been collectively written and accepted. In the meantime I just realised that taking democratic decisions was far from the main aim of most meetings. As long as it is clear, no problem 🙂

Speakers list and speech length
How to actually do it depends on the kind of meeting you want to get, and its size. Some random ideas :

  • Keep a speakers list with two columns if you want to ensure equal participation of two groups of people (with one usually louder than the other) : male / female, new members / people who have been there for ever, tech / non-tech… Then pick the first name of each column alternatively to announce the next speaker.
  • Fix a maximum time for each intervention (two minutes ?) and prepare sheets of paper with ’30s’ on it to tell the speaker that he/she only has 30 seconds left, and then in red ‘-30s’ or ‘-1min” when the time is over and he/she still doesn’t stop. There, the ability of the main moderator to really make people shut up becomes useful.
  • Keep in mind of how long the whole discussion on a topic should be – and what should be it’s outcome (vote? Concrete proposals?). With this data, the moderator or list-and-time-keeper can announce when will the speakers list for a particular topic be closed (like “time for 3 more speakers to register, then we close the list for this round”).

Note : for this kind or rules to work they must be clearly stated, explained and agreed at the beginning of the meeting.

Gesture
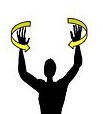
Here are basic gesture for participants to give their opinion without disturbing the speaker and therefore the flow of the meeting. Those are very important for the moderator and minutes keeper : if a big part of the audience expresses its agreement with a topic / idea, the debate should probably be shifted in that direction

-> Agreement : this gesture is supposed the replace “that’s a good idea” / “cool” / “I agree” / “Yeah I wanted to say that too!”.

-> Disagreement : to replace “bouuuh!” / “that’s sh*t !!!” / “how can you dare saying that, you stupid f**k!” and other things of this kind

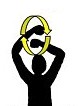
-> Repetition : this gesture needs to be used with care and requires the moderator’s vigilance. It can hurt and discourage some speakers (strangely, experience shows that it does it more than the “disagreement gesture”). To replace “you are repeating what a countless number of speakers have already say” / “go on ! It’s too slow !”. It of course doesn’t need to be done so high, I usually do it at chest level.

Other gesture can be added, especially for international meetings, like for example to express the need for translation of a particular point.

Conclusion
This post could go on forever, but what is important is just that we should put some time into the creation of formal or informal rules to make our meetings nicer, less hostile for newcomers and shy people, more democratic and in general… more useful and productive. Experiment, make up your own techniques and share it!